Posted by Unknown
On 12:38 PM

Umumnya ketika ketika melakukan retouching pada bagian tubuh kita melakukan perubahan pada skala pixel dimana kita memanipulasi pixel yang ada sehingga berubah. Cara ini tentu saja bertentangan dengan konsep retouching yang baik yaitu tanpa merusakan pixel dari foto sehingga kita tetap mempertahankan keaslian dari foto original. Pada tutorial kali ini saya memperlihatkan sebuah tips bagaimana merampingkan bentuk hidung tanpa merusak pixel dari foto dengan teknik non destructive retouch hidung dengan Adobe Photoshop. Untuk lebih jelasnya silahkan lihat pada video berikut.
by: Fotografidesain.com
Posted by Unknown
On 11:00 AM
Cara memasang meta tag yang seo Friendly adalah satu komponen yang harus ada di blog. Sedangkan untuk Meta Tag memang bermacam-macam cara ada Meta Tag tipe klasik,ada juga Meta Tag spind. Kebetulan ada satu teman yang minta kepada saya agar memposting tentang Meta Tag pada dasarnya semua meta tag bagus namun tinggal kita saja yang memilih mana yang terbaik. Dan dikesempatan kali ini saya akan coba menyampaikan Meta Tag yang sering digunakan para blogger. Adapun Meta Tag yang akan bagi ini ada 2 tipe yang pertama meta tag klasik dan yang kedua adalah meta tag spind. Yang pertama Meta Tag Klasik sampai sekarang masih dipergunakan oleh sebagian para blogger dikarenakan meta tag tersebut bisa sangat diandalkan dan itu juga saya terapkan disebagian blog dummy saya. Sedangkan yang kedua meta tag spind yang notabene sekarang lagi ramai dipakai oleh pengguna Blogspot padahal meta tag tersebut juga sudah lama digunakan oleh blogger. Memang untuk membikin agar blog Seo Friendlybermacam-macam cara dan tidak salahnya kita coba dan bagi yang masih ragu coba kalian terapkan saja diblog dummy atau di blog percobaan bikin satu artikel lalu diterbitkan setelah itu kalian ping di Webmaster dan ping dari pihak kedua tunggu beberapa saat lalu kalian cari disearch engine postingan kalian tersebut nangkring diposisi keberapa artikel kalian itu kalau artikel tersebut diposisi paling jauh berarti Meta Tag kita belum maksimal cara kerjanya,tapi dengan satu catatan bahwa artkel kalian itu ASLI BUKAN HASIL COPAZ. Baiklah mari kita pelajari sama-sama tentang META TAG SEO FRIENDLY yang terbagi 2 yaitu meta tag klasik dan meta tag spind.
- Pertama meta tag klasik itu seperti ini :
<b:if cond='data:blog.pageType == "index"'><title><data:blog.title/></title><b:else/><title><data:blog.pageName/>|<data:blog.title/></title></b:if>
- Kalau kalian mau dirubah sedikit dengan cara kalian cari code ini <title><data:blog.title/></title> atau kalian cari seperti ini <title><data:blog.pagetitle/></title>
Setelah ketemu kalian ganti code tersebut dengan code meta yang ini :
<link href='http://fonts.googleapis.com/css?family=Shadows+Into+Light' rel='stylesheet' type='text/css'/>
<b:if cond='data:blog.pageType == "index"'><title><data:blog.title/></title><b:else/><title><data:blog.pageName/>|<data:blog.title/></title></b:if>
Lalu kalian save.
- Nah itu dalah Meta Tag Klasik sekarang untuk meta tag spind bagaimana? Kalau untuk meta tag spind mari sama-sama kita pelajari lagi.
Pertama kalian coba pasang code meta tag ini seperti biasa dibawah <head> adapun code meta tag tersebut seperti ini :
<link expr:href='data:blog.url' rel='canonical'/>
<meta content='MASUKKAN CODE VERIFIKASI PUNYA KALIAN' name='google-site-verification'/>
<meta content='MASUKKAN CODE DARI BING' name='msvalidate.01'/>
<meta content='https://plus.google.com/CODE DARI GOOGLE PLUS PUNYA KAMU ' name='author'/>
<meta content='IE=EmulateIE9' http-equiv='X-UA-Compatible'/>
<meta content='document' name='resource-type'/>
<meta content='no-cache' http-equiv='cache-control'/>
<meta content='no-cache' http-equiv='pragma'/>
<meta content='true' name='MSSmartTagsPreventParsing'/>
<meta content='text/html; charset=UTF-8' http-equiv='Content-Type'/>
<meta content='text/html charset=iso-8859-1' http-equiv='Content-Type'/>
<meta content='document' name='resource-type'/>
<meta content='-5;120' name='geo.position'/>
<meta content='1, 2, 3, 10, 11, 12, 13, ATF' name='serps'/>
<b:if cond='data:blog.pageType == "index"'>
<b:if cond='data:blog.pageType == "item"'>
<title><data:blog.pageName/> | <data:blog.title/></title>
<b:else/>
<title><data:blog.pageTitle/> | TULIS JUDUL BLOG KALIAN atau DESCRIPTIONS</title>
</b:if>
<b:else/>
<title><data:blog.pageName/> | <data:blog.title/></title>
</b:if>
<meta content='text/html; charset=ISO-8859-1' http-equiv='Content-Type'/>
<meta content='http://NAMA BLOG KAMU.blogspot.com' id='e_vb_meta_bburl' name='vb_meta_bburl'/>
<meta content='vBulletin 4.1.10' name='generator'/>
<link href='http://fonts.googleapis.com/css?family=Oswald' rel='stylesheet' type='text/css'/>
<link href='http://fonts.googleapis.com/css?family=PT+Sans+Narrow' rel='stylesheet' type='text/css'/>
<meta content='blogger' name='generator'/>
<meta content='ISI TERSERAH KALIAN ' name='description'/>
<meta content='ISI SUKA-SUKA KAMU ' name='keywords'/>
<meta content='ISINYA SAMAKAN DENGAN DESCRIPTION ' name='subject'/>
<meta content='ISINYA SAMAKAN DENGAN KEYWORD ' name='abstract'/>
Setelah itu simpan....!!!
Nah jadi kalian sekarang sudah tahukan perbedaan Meta tag klasik dengan Meta tag Spind. semoga bisa berguna dan bermanfaat.
Posted by Unknown
On 4:41 PM

Mungkin sebagian dari kawan-kawan sudah tidak asing lagi dengan tips cara mencari kode verifikasi google webmaster ini. Tetapi tidak ada salahnya jika pada kesempatan kali ini saya mencoba mempublikasikan kembali cara verifikasi google webmaster.
- Login/masuk ke Gmail anda, setelah itu klik link ini . Secara otomatis langsung ketemu halaman akun sobat.lihat gambar di bawah ini sobat lebih jelasnya .MANAGE SITE --> posisinya sebelah kanan blog paling ujung.

Manage Site di Google Webmaster
- Kemudian langkah berikutnya adalah dengan klik tulisan Add or Remove owners, maka akan muncul seperti gambar di bawah ini. Pilihlah Verify using a different method (lihat tanda lingkaran merah)

Verifikasi Kode Google Webmaster
- Centang (pilih) Add a meta tag to your site's home page (lihat panah merah). Catatan : mungkin posisinya bisa berubah-ubah, sebaiknya ingat tulisan META TAG.

Verifikasi Kode Google Webmaster
- Copylah Kode Verifikasi Meta Tag seperti kotak merah pada gambar dibawah :

Kode Verifikasi Meta Tag Google
- Buka Blog Anda Paste-kanlah Script Meta Tag tadi ke Rancangan template blog anda. Letakkan setelah <head> atau sebelum </head> kemudian simpan template anda.
- Selanjutnya kembali ke Webmaster Tools anda klik Verifikasi. Kemudian muncul seperti gambar di bawah ini.

Kode Verifikasi Meta Tag Google
Tahap terakhir langsung saja klik continue. Proses pencarian kode verifikasi google webmaster telah selesai.
Posted by Unknown
On 1:10 AM

Tutorial explains how to modify a simple chalk brush then use it to create a nice colorful chalk text effect.
The Final Result:

Notes:
* the software used in this tutorial is Adobe Photoshop CS6, but you can use CS3+ versions as well.
* you might want to check the Basix Page to see some useful topics on dealing with Photoshop basics, such as loading palettes and some shortcuts.
Resources:
* Blank Vintage Chalkboard by Nicolas Raymond.
Step 1
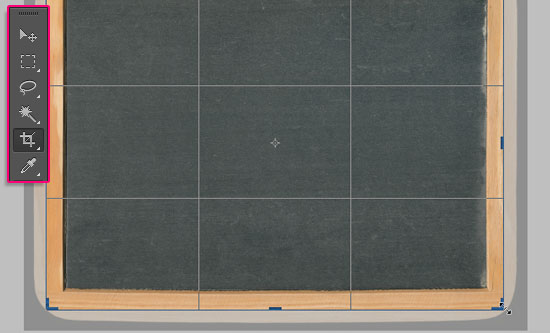
- Open the Blank Vintage Chalkboard image, then use the Crop Tool to get rid of the corners and the black background.
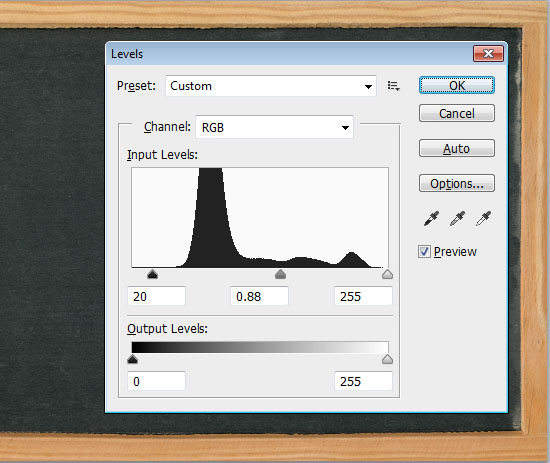
- Go to Image -> Adjustments -> Levels, then change the Shadows value to 20, and the Gamma value to 0.88. This will darken the image.
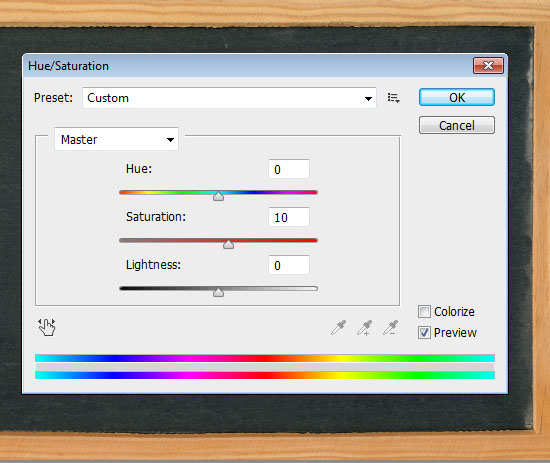
- Go to Image -> Adjustments -> Hue/Saturation, and change the Saturation value to 10. This will make the colors a bit more vivid.
Step 2
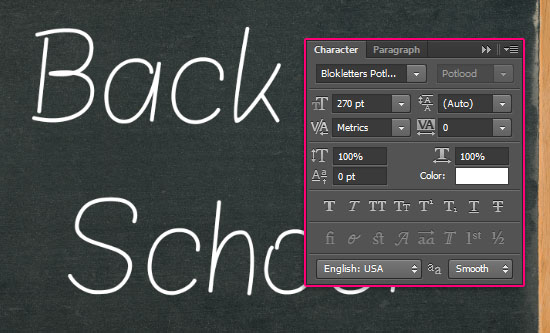
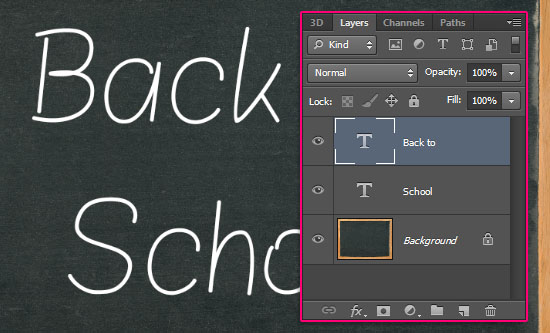
- Create the text in white using the font Blokletters Potlood, and the font size 270 pt.
- The text in this tutorial is created in two separate layers to demonstrate using more than one color, but you can go ahead and write your text in one layer.
Step 3
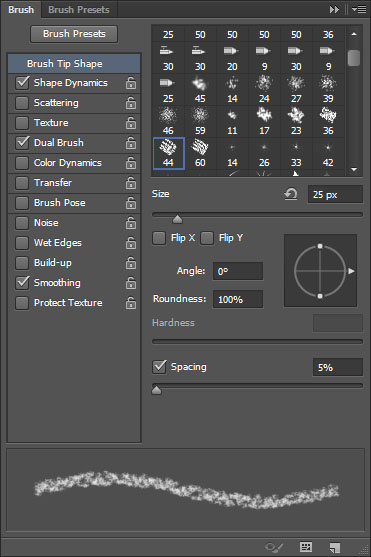
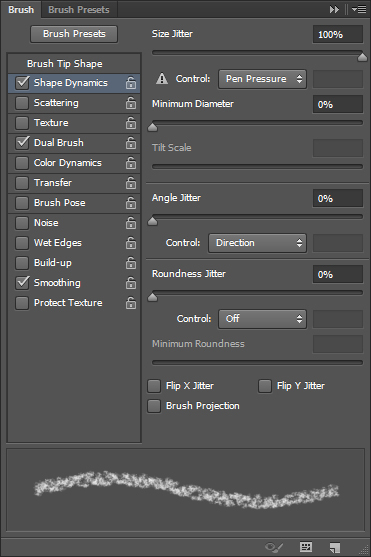
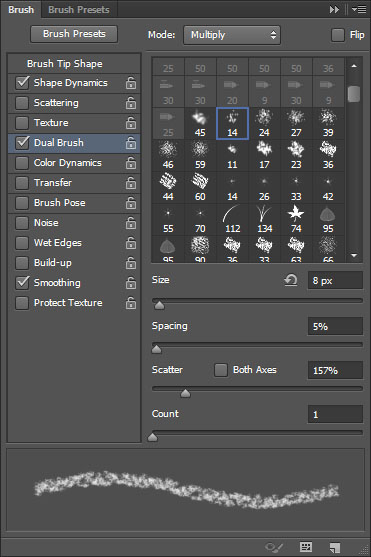
Open the Brush panel (Window -> Brush), then modify the Settings as shown below:
- Brush Tip Shape:
Choose the “Chalk 44 pixels” brush.
- Shape Dynamics:
- Dual Brush:
Choose the “Spatter 14 pixels” brush.
Step 4
- Make the text layer(s) invisible by clicking the eye icon(s) next to them.
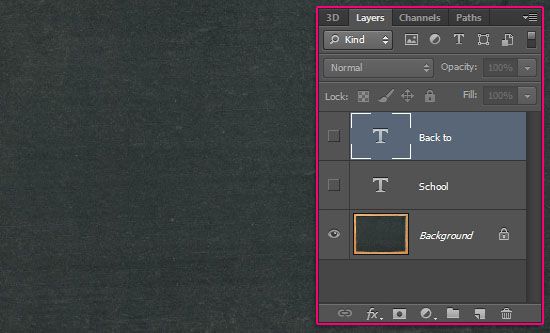
- Right click the text layer and choose Create Work Path.
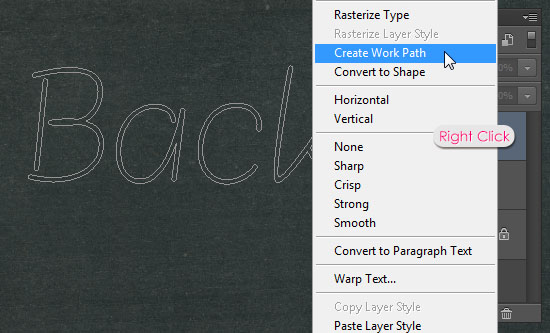
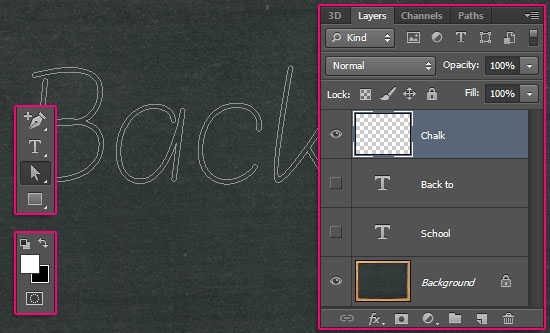
- Pick the Direct Selection Tool, set the Foreground color to White, and create a new layer on top of all layers then call it “Chalk”.
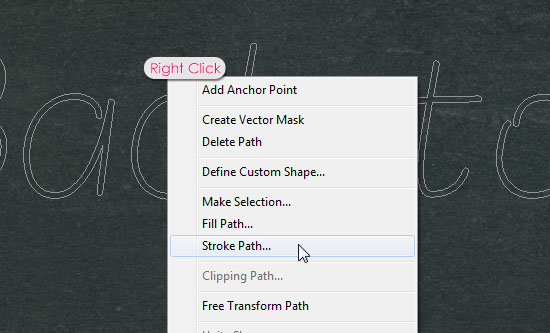
- Right click the work path and choose Stroke Path.
- Choose the Brush option from the Tool drop down menu, and make sure that the Simulate Pressure box is un-checked.
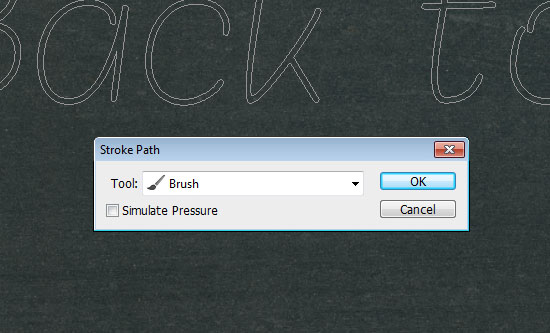
- This will stroke the path with the chalk brush. Hit Enter to get rid of the work path. Keep in mind that different font sizes might need different brush sizes.

Step 5
- To stroke each letter with a different color, you need to create the work path first, then, click and drag using the Direct Selection Tool to select the letter’s anchor points.
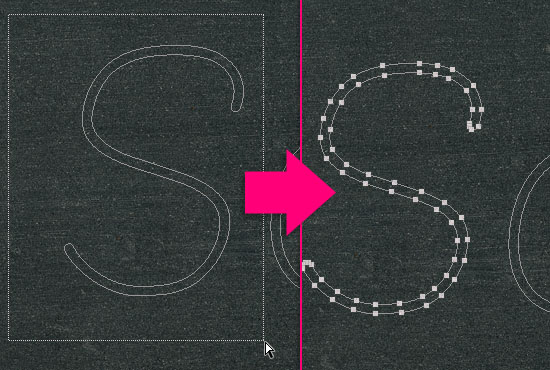
- Set the Foreground color to whatever color you like, lighter tones will look better. Then, stroke the path as you did previously. Don’t hit Enter until you’re done stroking all the letters.
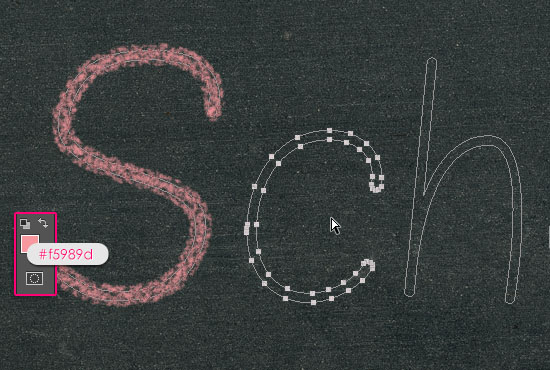
- The colors used here are:
S – #f5989d
c – #fff799
h – #bd8cbf
o – #fdbd89
o – #79bcde
l – #82ca89

Step 6
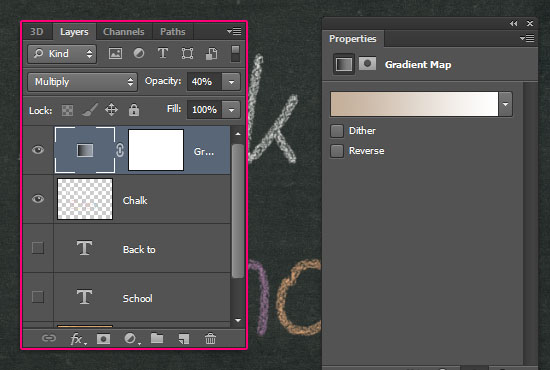
- The last thing we’re going to do is add a simple adjustment layer to enhance the coloring a little bit. To do so, click the Create new fill or adjustment layer icon down the Layers panel, and choose Gradient Map.
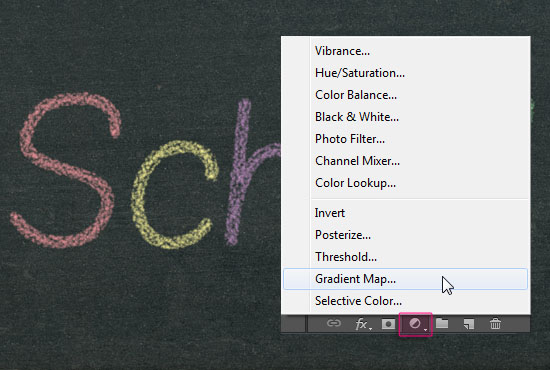
- Make sure that the adjustment layer is on top of all layers, then change its Blend Mode to Multiply and its Opacity to 40%.
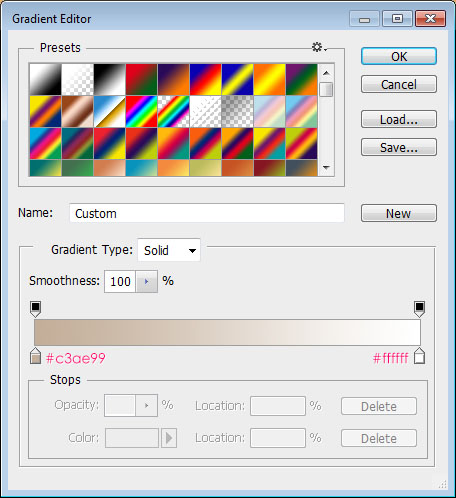
- The gradient uses two color, #c3ae99 to the left, and #ffffff to the right.
And you have your chalk text ready! Old school stuff, but timeless indeed

This is a Facebook cover version (Right click -> Save Image / as…).
Have a great school year

by: http://textuts.com
Posted by Unknown
On 1:36 PM
In this tutorial we will move through a series of simple design steps to create a cast of characters. This design sequence gives you the freedom to create unique characters while also defining the overall look and feel of your world.
We will go through the design of Sci-Fi cast, showcasing two opposing sides in a conflict; the rulers and the rebels. We'll go over how the decision to contrast an idea like Shape Design can create unique groups, while choosing to focus on simplified Tonal Design can unify the world that we’re creating.
Using these techniques you will be able to design a cast from scratch, respond to a brief, or troubleshoot weak character designs.
Contents of Files :
Designing a Cast of Characters in Photoshop.part01.rar
Designing a Cast of Characters in Photoshop.part02.rar
Designing a Cast of Characters in Photoshop.part03.rar
Designing a Cast of Characters in Photoshop.part04.rar
Designing a Cast of Characters in Photoshop.part05.rar
Designing a Cast of Characters in Photoshop.part06.rar
Designing a Cast of Characters in Photoshop.part07.rar
Designing a Cast of Characters in Photoshop.part08.rar
Designing a Cast of Characters in Photoshop.part09.rar
Designing a Cast of Characters in Photoshop.part10.rar
Designing a Cast of Characters in Photoshop.part11.rar
Designing a Cast of Characters in Photoshop.part12.rar
Designing a Cast of Characters in Photoshop.part13.rar
Subscribe to:
Posts (Atom)


